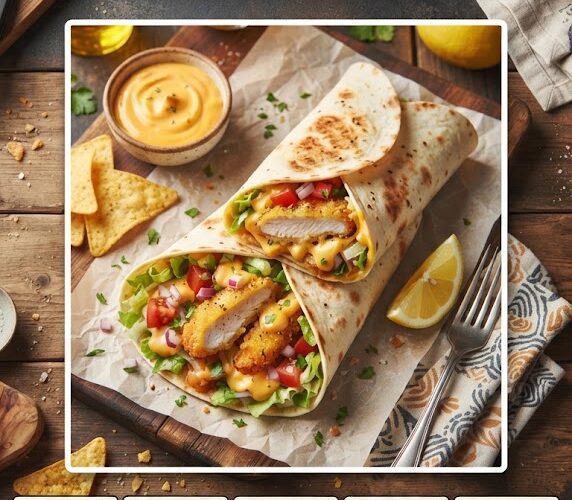
Crispy Lemon Pepper Chicken Wrap With Nacho Cheese for Busy Weeknights
If you need a dinner that is crispy, cheesy, flavorful, and easy enough for a busy weeknight, this Crispy Lemon Pepper Chicken Wrap with Nacho Cheese is a recipe worth saving. It combines golden, crunchy chicken with bright lemon pepper seasoning, creamy nacho cheese, fresh vegetables, and a warm flour tortilla for a restaurant-style meal you can make right in your kitchen.
This easy chicken wrap is especially useful on evenings when everyone is hungry but nobody wants a complicated dinner. The chicken can be prepared quickly in a skillet or air fryer, while the rest of the ingredients require little preparation. The result is a satisfying handheld meal with plenty of texture: crispy chicken, smooth nacho cheese, fresh lettuce, juicy tomatoes, and a soft tortilla.
Whether you’re searching for easy weeknight dinners, quick chicken recipes, crispy chicken wraps, family-friendly meals, or easy lunch ideas, this recipe checks all the boxes.
Why You’ll Love This Crispy Chicken Wrap
There are plenty of reasons this lemon pepper chicken wrap can become a regular part of your dinner rotation.
1. It’s quick enough for busy nights
You don’t need hours of marinating, complicated sauces, or a long ingredient list. With a little preparation, you can have crispy chicken wraps ready in roughly 30 minutes.
2. The flavor is bold
Lemon pepper gives the chicken a combination of citrusy brightness and savory peppery flavor. Nacho cheese adds creamy, salty richness that balances the fresh lemon flavor beautifully.
3. It has an amazing texture
The best part of this wrap is the contrast. The chicken is crisp on the outside and tender inside, while the tortilla is soft and slightly toasted. Crunchy lettuce and optional tortilla chips add another layer of texture.
4. It’s customizable
You can easily adjust the fillings to suit your family. Add avocado, jalapeños, black beans, corn, onions, salsa, ranch dressing, or extra cheese.
5. It’s family-friendly
The recipe can be made mild or spicy. For children, keep the chicken seasoning simple and use mild nacho cheese. Adults can add hot sauce, jalapeños, chipotle mayo, or spicy salsa.
Ingredients You’ll Need
For approximately 4 large chicken wraps, gather the following ingredients.
For the Crispy Lemon Pepper Chicken
- 1 pound boneless, skinless chicken breasts or chicken tenders
- 1 teaspoon lemon pepper seasoning
- 1/2 teaspoon garlic powder
- 1/2 teaspoon onion powder
- 1/2 teaspoon paprika
- 1/2 teaspoon salt, or to taste
- 1/4 teaspoon black pepper
- 1 tablespoon fresh lemon juice
- 1 teaspoon lemon zest
- 1 tablespoon olive oil
- 1/2 cup all-purpose flour
- 1/2 cup panko breadcrumbs
- 1 egg
- 2 tablespoons milk
For the Wraps
- 4 large flour tortillas
- 1 cup warm nacho cheese sauce
- 1 cup shredded lettuce
- 1 large tomato, diced
- 1/2 cup shredded cheddar cheese
- 1/4 cup diced red onion
- 1/2 cup crushed tortilla chips, optional
- 1/4 cup sliced jalapeños, optional
- 1/2 avocado, sliced, optional
Optional Sauce
For an extra creamy wrap sauce, combine:
- 1/3 cup mayonnaise
- 2 tablespoons sour cream
- 1 tablespoon lemon juice
- 1/2 teaspoon garlic powder
- 1/4 teaspoon lemon pepper seasoning
- A few drops of hot sauce, optional
Stir everything together and refrigerate until ready to use.
How to Make Crispy Lemon Pepper Chicken Wraps
Step 1: Prepare the Chicken
If using chicken breasts, slice them horizontally or pound them gently until they are an even thickness. You can also cut them into strips.
Evenly sized chicken pieces cook more consistently and make the finished wraps easier to eat.
Place the chicken in a bowl and add lemon pepper seasoning, garlic powder, onion powder, paprika, salt, black pepper, lemon juice, lemon zest, and olive oil.
Toss until every piece is evenly coated.
Let the chicken sit for about 5 to 10 minutes while you prepare the coating.
You don’t need a long marinade for this recipe. The lemon zest and lemon pepper seasoning provide plenty of flavor without requiring hours of preparation.
Step 2: Create the Crispy Coating
Set up a simple breading station.
Place flour in one shallow bowl.
In a second bowl, whisk together the egg and milk.
In a third bowl, combine the panko breadcrumbs with a small pinch of lemon pepper seasoning and paprika.
Take each piece of seasoned chicken and coat it lightly in flour.
Shake off excess flour.
Dip the chicken into the egg mixture.
Finally, press it into the seasoned panko breadcrumbs.
Make sure the breadcrumbs stick to the chicken.
The panko creates a particularly crunchy coating. If you prefer an even thicker crust, dip the chicken into the egg mixture and breadcrumbs a second time.
Step 3: Cook the Chicken
You have several options for cooking the crispy chicken.
Skillet Method
Heat about 2 to 3 tablespoons of neutral cooking oil in a large skillet over medium heat.
Once hot, carefully add the breaded chicken.
Cook for approximately 4 to 5 minutes per side, depending on thickness, until the coating is deeply golden and the chicken is cooked through.
The USDA recommends cooking poultry to a safe minimum internal temperature of 165°F (73.9°C) measured with a food thermometer.
Don’t rely only on the outside color to determine whether chicken is done. A thermometer provides a much more reliable check.
Transfer the cooked chicken to a clean plate or wire rack.
Allow it to rest for a few minutes before slicing.
Air Fryer Method
If you’d rather use an air fryer, lightly spray or brush the breaded chicken with oil.
Place the chicken in a single layer in the air fryer basket.
Cook at approximately 400°F until golden and cooked through, turning halfway through.
Cooking time varies depending on the thickness of the chicken and the individual air fryer, so use the chicken’s internal temperature as the final safety check.
Avoid overcrowding the basket because airflow is important for achieving crispy chicken.
Oven Method
Preheat your oven to approximately 425°F.
Place the breaded chicken on a lightly greased baking sheet or wire rack set over a baking sheet.
Lightly spray the chicken with cooking oil.
Bake until golden and cooked through, turning halfway if needed.
Again, verify that the thickest portion reaches 165°F.
Step 4: Warm the Nacho Cheese
While the chicken is cooking, warm your nacho cheese sauce.
You can use homemade cheese sauce or your favorite store-bought nacho cheese.
For a smoother texture, warm it gently instead of boiling it.
If the cheese becomes too thick, stir in a small splash of milk.
For extra flavor, mix in a pinch of garlic powder, smoked paprika, or a little diced jalapeño.
Step 5: Prepare the Fresh Toppings
Dice your tomato and red onion.
Shred the lettuce.
Slice the avocado if you’re using it.
You can also prepare jalapeños, corn, black beans, cilantro, or salsa.
Keep the vegetables relatively dry. Excess moisture can make the tortilla soggy.
This is especially important if you’re preparing several wraps in advance.
Step 6: Warm the Tortillas
Warm each flour tortilla in a dry skillet for about 10 to 15 seconds per side.
You can also warm tortillas briefly in the microwave.
Warm tortillas are easier to fold and less likely to crack.
Place each tortilla on a clean work surface.
Step 7: Assemble the Chicken Wrap
Now comes the fun part.
Spread a layer of warm nacho cheese over the center of the tortilla.
Add sliced crispy lemon pepper chicken.
Top with shredded lettuce, diced tomatoes, red onion, and shredded cheddar.
Add crushed tortilla chips if you want extra crunch.
For a spicy version, add jalapeños and hot sauce.
Drizzle with the creamy lemon pepper sauce.
Don’t overfill the tortilla. Too many ingredients can make the wrap difficult to fold.
Step 8: Fold and Toast
Fold the sides of the tortilla inward.
Then fold the bottom portion over the filling.
Roll the tortilla tightly toward the top.
Place the wrap seam-side down in a dry skillet over medium heat.
Toast for approximately 1 to 2 minutes per side.
This step is optional, but highly recommended.
Toasting gives the tortilla a lightly crisp exterior while helping the melted cheese hold the wrap together.
The Flavor Combination That Makes This Wrap Special
The magic of this recipe comes from balancing several different flavors.
Lemon
Fresh lemon juice and zest provide acidity and brightness.
Black Pepper
Pepper gives the chicken a slightly spicy, savory bite.
Nacho Cheese
Creamy cheese adds richness and a familiar Tex-Mex flavor.
Crispy Chicken
The crunchy coating provides the satisfying texture that makes this wrap feel like a restaurant meal.
Fresh Vegetables
Lettuce, tomatoes, and onions add freshness and keep the wrap from becoming too heavy.
Flour Tortilla
The soft tortilla brings everything together into a convenient handheld meal.